From the very beginning of the TWI program, the underwriter’s knot has played a significant role in spreading knowledge about the program. At a meeting in New Jersey in the spring of 1941, it was decided to include it in the TWI training program as an example that demonstrates a job. It had previously been successfully used for many years in “New Jersey Vocational Education Staff”. From a training point of view, it was necessary to use a process that is so simple that the person, after hearing and seeing the Important Steps and Key Points,s is able to do the task. What is more, the knot is very practical because you can perform work more than once on the same piece of material after untying the previous knot, and the only thing you need is two pieces of string. Although we all encounter knots every day, whether while tying our shoes or clothing, this type of knot is not common. Therefore, there is a high probability that during training, we will only have people who have never had contact with it, and this is the case. We have conducted over 700 TWI workshops, and you can count the people who know this knot using the fingers on one hand. In turn, it is also so widespread that it will be difficult to find a TWI specialist who has never had contact with it. Everyone knows that the implementation of this knot consists of 5 Important or Major Steps. However, is the original Job Breakdown Sheet for this operation correct?
Known versions of the Job Breakdown Sheet for the underwriter’s knot
Historically, the best-known version of the Job Breakdown Sheet for the underwriter’s knot (Figure 1) is an example that was published in 1944 in a manual named “Job Instruction”. It contains the Important Steps and Key Points for the tying process and was used in training sessions conducted during the war program for industry in the USA. It is divided into 5 Important Steps, which have 6 Key Points assigned to them.

Figure 1. Job Breakdown for the underwriter’s knot from the Second World War
The next version (Figure 2), which we want to present here, was published in the TWI Workbook. Many training companies from the field of the TWI program use the standard that is written there. This sheet contains, like the previous one, only the Important Steps and Key Points. The Reasons appeared a bit later. Many of us reading this article surely know it by heart and have used it when presenting the Instructing Employees method.
| IMPORTANT STEPS | KEY POINTS | REASONS |
| 1. Untwist and straighten | 6 inches | Leave enough length for the next operation. |
| 2. Make a right loop | In front of the main strand | The knot will not tie correctly. |
| 3. Make a left loop | 1. Pulling end toward you 2. Under the stub 3. Behind the main strand |
1. It’s easier to do the next motion. 2. The knot will not tie correctly. 3. The knot will not tie correctly. |
| 4. Put end through loop | ||
| 5. Pull taut | 1. Ends even 2. Sliding loops down 3. Firmly |
1. The knot will tie evenly. 2. So the knot ties in the correct position. 3. So it won’t come apart. |
Figure 2.Job Breakdown Sheet for the underwriter’s knot developed on the basis of the TWI Workbook
Future version of the Job Breakdown Sheet for the underwriter’s knot
If you are a TWI Practitioner, you certainly know this standard by heart. However, when conducting training, you have probably had a lot of doubts related to whether this sheet is correctly built. Based on our experience in the TWI program and the thousands of instructions we have made in production and service areas, we have developed a Job Breakdown Sheet (Figure 3) that is a corrected version of the two previous ones. It contains changes that result from the repetition of tying the knot and which have their justification in the principles of creating the Job Breakdown Sheet.
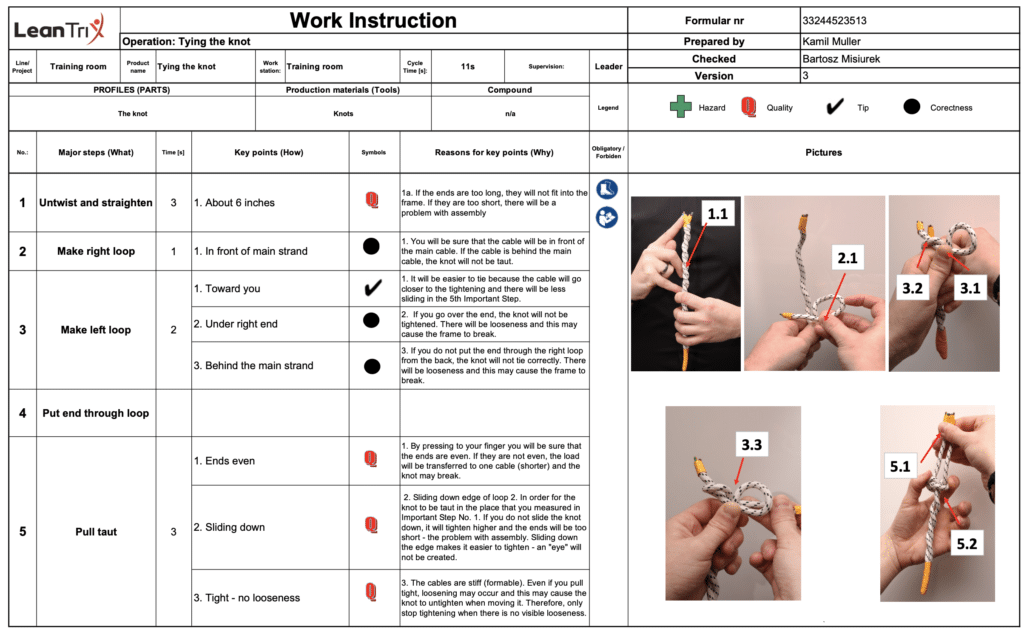
| Major Steps | Key points | Reasons for the key points |
| 1. Measure length of untied cable | 1. About 6 inches | 1. If the ends are too long, they will not fit into the frame. If they are too short, there will be a problem with assembly. |
| 2. Untie ends | 1. Straightening ends | 1. The cable is stiff. If you do not straighten the ends, it will be much harder to slide the loops in the fifth Important Step. |
| 3. Make right loop | 1. Holding with thumb | 1. You will be sure that the cable will be in front of the main cable. If the cable is behind the main cable, the knot will not be taut. |
| 4. Make left loop | 1. Toward you | 1.It will be easier to tie because the cable will go closer to the tightening and there will be less sliding in the 5th Important Step. |
| 2. Under right end | 2. If you go over the end, the knot will not be tightened. There will be looseness and this may cause the frame to break. | |
| 3.Right loop – from back | 3.If you do not put the end through the right loop from the back, the knot will not tie correctly. There will be looseness and this may cause the frame to break. | |
| 5.Pull taut | 1.Ends even – under finger | 1. By pressing to your finger you will be sure that the ends are even. If they are not even, the load will be transferred to one cable (shorter) and the knot may break. |
| 2.Sliding down edge of loops | 2.In order for the knot to be taut in the place that you measured in Important Step No. 1. If you do not slide the knot down, it will tighter higher and the ends will be too short – the problem with assembly. Sliding down the edge makes it easier to tighten – an “eye” will not be created. | |
| 3.Tight – no looseness | 3. The cables are stiff (formable). Even if you pull tight, loosening may occur and this may cause the knot to untightenwhen moving it. Therefore, only stop tightening when there is no visible looseness. |
Figure 3. JBS for the underwriter’s knot developed from our experiences
Reasons build consciousness and constitute real knowledge. This is why we have also found answers to “why” for all the introduced corrections. A comparative analysis was carried out for the Job Breakdown Sheet from the TWI Workbook.
Major steps, not important steps
Exactly. Major Steps or Important Steps? We definitely adhere to the use of Major Steps. Why? It is because every step is important, but not every one is major. The Job Breakdown Sheet is about catching the Major Steps; those that give you progress in work. It is not about writing down important steps at all. All the steps in a process are important because without them, it is impossible to do a job.
Let’s go back to the merits. The first thing that distinguishes both sheets (Figures 2 and 3) is the first Major Step, which was changed. In our proposal, we have “Measure length of untied cable”. One of the principles of creating a Job Breakdown Sheet says that for a major step to be a Major Step, there needs to be progress in a job. It is not difficult to notice that in this situation, there is no progress in the job. After all, nothing happens after measuring. So why did we decide to place this step as the MajorStep?This is due to the following principle: Quality control and controlled measurements are treated as a Major Step. Although they do not cause any progress in a job, they allow you to go further in the process. Without them, we cannot move on to the next step. This is important in the context of the job performed by a man, and therefore, the quality control and controlled measurements should be treated as Major Steps. The Key Points in this case will be e.g,. statements that help to determine how to measure, how to control correctly, or what to pay attention to.
We also resigned from the Major Step “Put end of cable through loop”. The reason for this is that by instructing new people totie the knot, they intuitively put one end through the loop without stopping behind the main cable, as is the case in the compared Job Breakdown Sheet. This Major Step, however, is included as a Key Point when making the left loop, because it is an integral part of it. In fact, when performing this operation, learners more often indicate that the cable should be put through the loop from the back. Failure to do this can cause an error.
Key points
Using gerund verbs, i.e., verbs ending with “-ing”, is a procedure that allows a step to be introduced into a Key Point when it is absolutely necessary. We have to define what the Major Step is and whether we also have to do different steps when implementing it. If this is the case, we suggest using this form. In the analysis sheet, there are 2 examples of steps that are implemented during the Major Step. It is worth emphasizing, however, that verbs (they answer the question “what” and not “how”) cannot be used in Key Points, and gerund verbs are an acceptable but not ideal form. This is why we decided to remove one of the gerund verbs. Instead of “Pulling end toward you” in 3.1, we gave “toward you”. It will be clear to a learner during the training.
A very important change is in Key Point 5.3. – “firmly”. This word is contrary to one of the principles of describing Key Points: do not use generalizing words; try to be precise. The word “firmly” does not really mean anything because it means something different to every person. There is, therefore, room for individual interpretation, which is undesirable in job standards. We decided to change this clue to “Tight – no looseness”, which more clearly reflects the idea of this Key Point. There should be no looseness between the tied cables. This looseness will probably occur when a small child ties this knot “hard”.
Reasons for the Key Points
If we want conscious staff, it’s worth focusing on an in-depth study of the reasons for Key Points. In many cases, the role of Reasons is underestimated and instead the following is written: “Such a standard”, “Client’s requirement” etc. However, it should be known that such constructed Reasons will not teach our employees why they perform their job, as is the case in the description in the standard – employees will not know the consequences of what will happen when they do not complete their job correctly.We recommend that the consequences, and therefore what can happen when we do not comply with the standard, should be described in the Reasons. For example, if we do not use grease, it will be harder to place the element during the final assembly. Therefore, in our opinion, the Reasons in the analyzed sheet should be expanded, particularly for key points 2.1., 3.2. and 3.3., where the description:”The knot will not tie correctly” could actually not exist because it does not contribute anything to an employee’s awareness. Another problem occurs with Reason 5.1, where for the Key Point “ends even,” the Reason is: The knot will tie evenly. The question is, did learners become aware of how this problem affects the customer? They only know that the ends will not be even, and this can actually be guessed. A good Reason shows the effects for a customer or the production process. And the fact is that if they were not even, the load during suspension will be transferred to one cable (shorter,) and it may break (the cable will not withstand this).
Job Breakdown Sheet – good construction
A good Job Breakdown Sheet has a construction that we call 10-30-60. This is shown in Figure 4.

Figure 4. The correct construction of a Job Breakdown Sheet
It is worth expanding the Reasons in a Job Breakdown Sheet, as our employees get their awareness from them. During training Instructor mainly uses the division into the Major Steps and Key Points. The Reasons and photos are a perfect building block of the TWI Instruction or SOP (Figure 5).
 Figure 5. TWI Work Instruction the underwriter’s knot developed on our experiences
The difference is in visualization, which is important for a new person. TWI instructions (which are very often called SOP) are something that our team has been developing since 2007. This is a great addition to the classic TWI JI method. Why then has the TWI Instruction not been historically established, when a Job Breakdown Sheet has? We dare to assume that this is due to a prosaic reason – there was no free access to printers and cameras during WWII. Today there is.
Summary
We feel that the TWI program must keep up with the times. It’s about developing the skills of leaders involved in training (in the case of the TWI JI method). But training is not possible without a correct Job Breakdown Sheet. We believe that due to this article, you will no longer look at the preparation of a Job Breakdown Sheet as filling in 3 columns, but instead the creation of a real standard that facilitates training. The rules developed by us will be helpful for this.

I am a promoter of Lean Management and the Training Within Industry program. I am a practitioner. I co-create many startups. Since 2015, I have been the CEO of Leantrix - a leading Lean consulting company in Poland, which, starting from 2024, organizes one of the largest conferences dedicated to lean management in Poland - the Lean TWI Summit. Since 2019, I have been the CEO of Do Lean IT OU, a company registered in Estonia that creates the software etwi.io, used by dozens of manufacturing and service companies in Europe and the USA.

Training Within Industry and Lean Management Practitioner.
He is a lecturer at the WSB University in Wrocław. He is the author and co-author of several pieces of literature on the TWI program.
He is a managing partner in the LeanTrix company and a master Trainer for Europe. Additionally, he is involved in projects such as eTWI System and Lean Community
He has run projects for: Lotte Wedel, Danone, Kompania Piwowarska, eobuwie.pl, Arvato, Whirlpool, B / S / H, Geberit, RECARO, Tenneco, Sumitomo Electric, Stadler, Vesuvius Poland